Showing posts with label Lemon. Show all posts

Monday, 8 February 2016

Ponderoma Pancakes

A recipe inspired by the Ponderoma - the strange, shadowy servants who inhabit Castle Zarcalat
It's Pancake Day tomorrow. Yay! 

I do love a pancake. 

Junior and I got busy this evening and knocked up a few delicious, fluffy pancakes for supper. Not the large, thin kind but the chunkier crumpet variety. 

Click here to see our Flipagram. 

Served with a hefty squirt of lemon juice and lashings of runny Maple syrup, they were absolutely stunning.

In Bree McCready and the Half Heart Locket Bree, Sandy and Honey find themselves trapped in a medieval castle. They meet a man called Don Daines who takes them into the castle kitchen and it's here where they see the Ponderoma for the first time.


 "As soon as they opened the door they were met by the sounds of clattering dishes and sizzling hotplates. Inside was a large well-lit kitchen where an army of cloaked people were so busy stirring, tossing and kneading that they did not even look up. The scent of herbs and spices mingled with the heavy aroma of food frying. Fresh fruit and vegetables were lined out on a long wooden table and great billows of steam rose up from huge black cauldrons hanging over raging fires. Loaves were turning brown in an open furnace, filling the air with their mouth-watering aroma. Huge chunks of raw meat were being rolled in crystal salt before being strung up on metal hooks.

The strange, shadowy servants scuttled to and fro, carrying dishes and platters. Bree could see that their hands were red and blistered. Cavernous hoods concealed their faces, making the floor length robes look empty, as though they were floating around the kitchen like canvas ghosts.

Don glided over to a huge stove where two Ponderoma were using a giant spoon to stir a thick batter. The smell of hot fat filled the air as they watched a servant pouring a ladleful onto a gridle. It instantly started to bubble, eventually solidifying into a plump round pancake."

Want to make those plump round pancakes? Here's what you'll  need:


1 and a half cups of plain flour
A quarter of a cup of sugar
3 teaspoons of baking powder
A pinch of salt
1 egg
1 and a half cups of milk
3 tablespoons of butter


Measure out the butter and melt it in the microwave for 20 seconds. Keep a close eye on it, you don't want it to burn.


Set the melted butter aside while you prepare the other ingredients.


 Measure out the flour and add it to a large mixing bowl.


Sprinkle in the baking powder and a good pinch of salt.


Measure out the sugar. You don't need much as the Maple syrup topping will offer much sticky sweetness.


So, you now have all your dry ingredients in the mixing bowl. Now it's time to prepare the wet stuff.

Crack an egg in a small mixing bowl and whisk


Add the milk and melted butter to the beaten egg and whisk together with a fork. Make a well in the centre of the flour mixture and pour in the egg mixture.


Whisk!

The batter should be slightly thick and lumpy

Now that the batter is ready let it sit for a few moments while you heat the frying pan. You'll need a fairly high heat and a knob of butter for each pancake. Heat the butter until it's frothy and sizzling.


Use a ladle to get equal sized pancakes

I always find the first pancake is a little wonky. Is that just me? Still tastes good but it usually takes the second or third attempt to get things perfect. Perhaps it takes that long for the frying pan to get to the correct temperature? One of life's little mysteries I suppose.


Cook on one side for around two to three minutes. You'll know when it's ready to turn when little bubbles appear on the top. Turn it over using a fish slice and cook for a further two/three minutes. The pancake should be nice a brown with a slightly crispy edge.


A bit like this
 Now for the fun part!

Ready, steady...

FLIP!!

My recipe made 8 large pancakes.
There could only be one topping
Lashings of Maple Syrup. Yumalicious.
A squeeze of lemon
Tuck in


Have a flippin' fantastic Pancake Day. 


See you again soon!

Wednesday, 1 July 2015

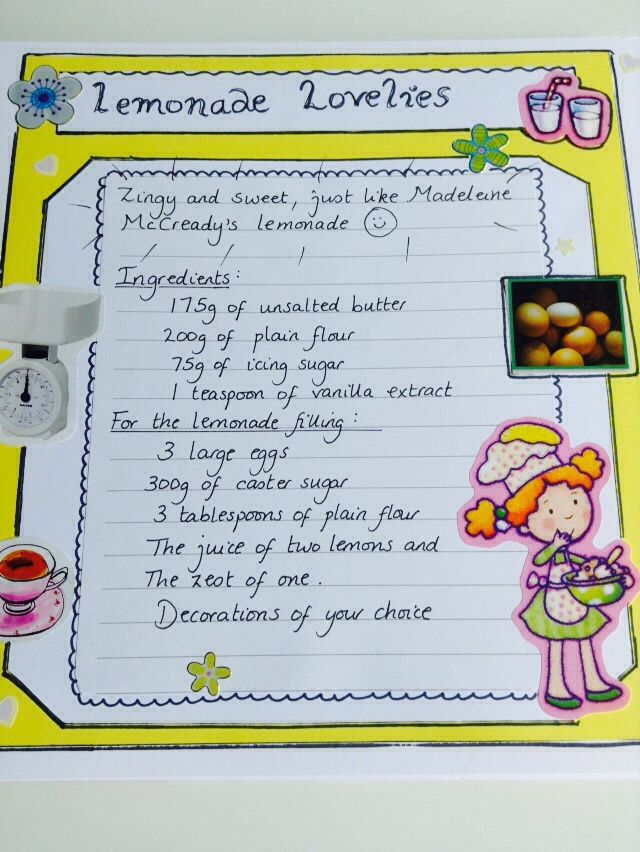
Lemonade Lovelies

 
A recipe inspired by Madeleine McCready's Homemade Lemonade.


I love the Scottish summer. It's the best day of the year by far. And as it's the first day of July, here is the perfect treat to accompany the big glowing ball of yellow that is out in all its glory.

These are my Lemonade Lovelies - sweet and zesty with a little crunch around the edges. I always feel inspired to create summery treats when I read from 'Flame of Irenus', the second book in the Bree McCready series. I love joining Bree, Sandy and Honey on the rooftop garden as they chill out 'under a high August sun' during the last summer break before they start High School.

Here's an excerpt from Chapter 1...

"Who's this pretty face?" asked Honey, pointing out a shy-looking girl in the photograph.
"That's my mum," said Bree.
"I didn't know your Mum and Dad went to school together!"
"Yes, they met at school. It was chemistry."
"Oh boy," grinned Honey. "When the chemicals kick in nothing can stop love!"
"No-they fell in love during chemistry. They had it first period on a Monday."
As if on cue, Bree's mother climbed up the ladder to the roof garden, bearing a jug of homemade lemonade. "Anyone for a top up?"
"Yes please, Mrs M." Sandy held his glass up in the air.
Madeleine laughed and climbed the last few rungs of the ladder. She wore a loose, raspberry-coloured tracksuit and had pulled her ponytail through the gap at the back of a baseball cap.
"Heavens, Sandy, don't get up. I'll come to you."
Once Sandy's glass was refilled he gave a thumbs-up to thank her. She ruffled his hair affectionately and made her way over to the girls.

So, gather together your ingredients, it's time to celebrate summer in style!

This recipe makes approximately 12 squares of lemony loveliness.

1. Preheat your oven to 180C (fan 160C) Gas Mark 4.

2. Grease and line a 21 x 31 baking tray - make it a deep one as the filling overflowed the first time I tried this recipe! Baking is a bit like life. We learn from our mistakes.

These are the ingredients you will need.


METHOD:

For the melt-in-the-mouth shortbread base -

1. Sieve the flour and icing sugar together into a large bowl and add the vanilla essence.

2. Cut the cold butter into cubes. This is not easy when your hands are summer warm so it's best to work quickly!

  
3. Add the butter to the bowl with the flour and icing sugar and rub together until the mixture resembles fine breadcrumbs. Don't worry if there is the odd lump of butter visible.

It should look a bit like this.


4. Knead everything together to form a soft dough then wrap the dough in clingfilm and refrigerate for a few minutes to let it firm. This will make it easier to handle.


Dough-ball!
  
5. Take the dough out of the fridge and carefully pat and pull it onto the base of the greased baking tray until the whole area is covered. This will take a little time to get right so be patient and don't worry about getting it perfect. As long as it's roughly covering the base and is about the same depth all over, that's all that matters. Prick all over with a fork.

6. Pop into the hot oven and bake for 20 minutes until slightly golden.

Now, I'm a very tidy cook. I hate chaos and prefer a clear work surface and minimum mess. So while the base is cooking and filling the kitchen with its sweet aroma I like to tidy things away, ready for the next step!


The Next Step - The Lemonade Filling:

1. Whisk the eggs, caster sugar, flour, lemon juice and zest until frothy. I prefer using my electric whisk for this but you can do it by hand too.

 2. Take the golden base from the oven and while it's still hot pour the lemonade mixture over the top.

3. Return to the oven for a further 25-30 minutes or until the top looks light golden brown. My advice would be to keep an eye on this as the sugary mixture can easily 'catch' and burn. 

4. Remove from the oven and leave in the tray to cool.


Don't worry about the brown bits. They add a little bit of c-r-u-n-c-h!

5. When things have cooled and the cake has firmed up it'll be easier to remove from the baking tray. Lift it out using the edges of the parchment paper and cool for another little while on a rack. 

6. Prepare your decorations! This is the fun part as you can use anything you like. I used these...


...but you could also use lemon slices, Smarties, sprinkles, lemon zest, a dusting of icing sugar...the list is endless!

7. I like to cut away the rough edges before I cut into squares. This gives a uniform appearance and gets rid of the really crispy bits. It also gives me the perfect excuse to do some taste testing!

The finished result
 

Love and sticky fingers, Hazel X