Showing posts with label magic. Show all posts

Friday, 30 October 2015

Halloween Treats

"Chills in the night air are tingling skin
The veil between worlds is now growing thin
Bright spirits gather, the dead return
Drawn to the flickers where candles burn"
Louise Heyden


Did I scare you? Sorry! But I'm getting into the Halloween spirit. It's tomorrow in case you didn't already know. As promised, here are a few simple goodies which require no baking whatsoever...just a few hours in the kitchen and A LOT of chocolate!

Have a lovely time tomorrow night. Stay safe if you're out Trick or Treating and remember to give your teeth an extra clean before you go to bed.

Mummy lecture over.
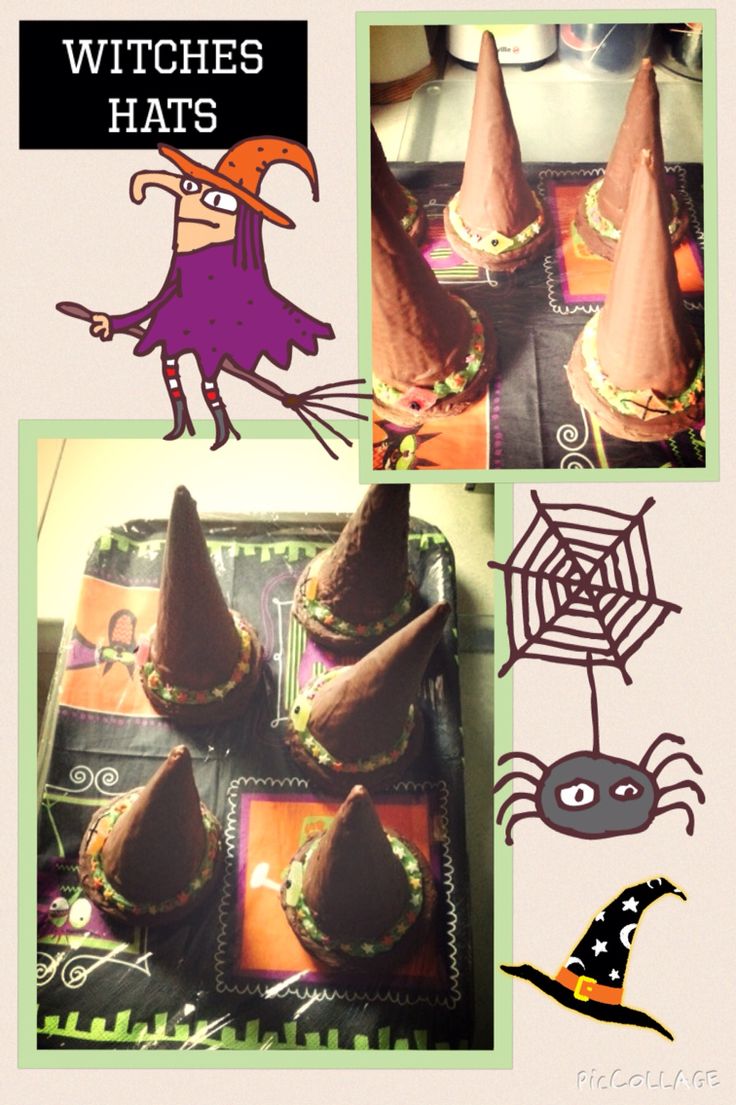
These took the longest to make...and the most mess to clear up (at 1 o'clock this morning!)
It's a pretty simple idea but tricky to assemble. Inside these chocolate hats are lots of little sweets - Skittles, chocolate buttons, Smarties etc - so attaching the ice cream cone to the Wagon Wheel base involved some pretty impressive construction skills and lots of patience! To my frustration I discovered that because of a slight slant to the waffle style cone, there was a gap at the bottom of the cone - big enough to allow some of the smaller sweets to spill out. So I had to carefully craft thin strips of Royal icing (luckily I had some ready made stuff to hand) to wrap around the bottom of the cone. I knew this 'patch up job' would be invisible once the chocolate was painted on. 
Once the basic structure was complete it was a case of painting on melted chocolate with a pastry brush then waiting for that to set in the fridge before adding the finishing touches. I'm hoping the final result will be like a Pinata so the kids will bite into the top of the hats to reveal the hidden goodies inside. I won't know for sure how everything has turned out until tomorrow night but I can hear the sweets rattling around inside so that's a good sign. And I'm quite sure these are going to taste amazing.


Again, a very simple idea which looks effective. I used small waffle biscuits for the base but you could use Oreos or even made your own basic cookies. 

I rolled out icing, cut it to size with a cookie cutter then stuck it onto the biscuit base using jam. I used edible writing icing (which I bought from Lakeland) to give a bloodshot effect and Smarties were used to create the different coloured Irises.


These don't require much skill but they're pretty and magical. A nice change to blood and gore! 

I dipped chocolate fingers into melted chocolate  then laid them flat onto greaseproof paper before sprinkling multi-coloured stars on top.

Make a wish!


Cadbury's Mini Rolls are fab at this time of year as you get the kind with green slime jam and raspberry blood inside.

The monster faces were made using white chocolate buttons, mini chocolate beans and black icing. I got the small gummy teeth from Morrisons.


Line up white chocolate fingers along a cooling rack and drizzle over melted white chocolate to create the look of bandages. Use tiny dots of black writing icing for the eyes. 

I love these! 


So, there you have it. Couldn't be simpler really and yet I know the kids are going to love these treats.

I have to confess to having eaten a few 'spare' chocolate fingers and to licking a few bowls over the last couple of days so I will probably not be partaking in the scoffing of any more Halloween goodies. In fact I am craving some homemade soup and fruit! 

Have fun!

Until next time, here is a spooky extract from Bree McCready and the Realm of the Lost, which of course is my inspiration for all these Halloween goodies.

"Bree hit the fresh air with a stitch in her side. Running in the direction of Gillespie Gardens, she hoped that Sandy had made his way back to Freesia House. She slowed when she spotted some children heading her way, dressed for Halloween in ghoulish costumes, shouting 'Trick or Treat!'
Stepping off the pavement to let them pass, she spotted three small figures whizz by on the other side of the road. At first she thought it was another group of children, wearing gruesome masks, but when she looked closer she caught a glimpse of bare, red skin and yellow eyes. Gargoyles."


Saturday, 3 October 2015

Don Daines' Magic Key Lime Pie

A recipe inspired by Don Daines' Magic Key in 'Bree McCready and the Half Heart Locket'

Tomorrow my good friends, The Galls, are hosting a coffee afternoon to raise funds for MacMillan and Marie Curie Cancer Care, two charities that provide much needed care and support for people living with terminal illness across the UK. It was because of MacMillan and Marie Curie that Neil's Mum, Alice, was able to be at home with her family during her long and courageous battle with cancer.

What better reason could there be to put my love of baking into action? I've been up since 7:30 this morning making individual pumpkin pies with cream and pecans, Malteser traybake and these little daisy decorated cupcakes:


 But it's the Key Lime Pie I'd like to focus on for this blog post. This one is for you, Alice. Here's hoping plenty of cash will be raised in your name.

The idea for this pie was inspired by a character in the first Bree McCready book. His name is Don Daines. Not many people know this but his name came from my son, who at the time of writing the novel was about 3 years old. As he was learning to talk, he often asked to "Don Daines". This was his way of asking me to "Go downstairs". And so a charater was born.

We first meet Donald Daines in Chapter 15 of Bree McCready and the Half Heart Locket. I won't give too much of the story away but the chapter is entitled Help From a Friend so that's a little clue! Here is a quick excerpt:

"Don pulled a polished silver key from the bunch at his hip and pressed it into Bree's hand. 'This should help you out of any tricky situations,' he smiled, folding her fingers around the tiny key."

And boy, does that little key come in very handy! Not just in book 1 but also in book 2 and 3! 

A while ago I saw this cute little sillicone mould online:

  
I immediately thought the middle key looked exactly how I'd imagined the magic key to look so I ordered it and got to work thinking of the perfect recipe to go with it. 

And voila! Here are the ingredients for Don Daines' Magic Key Lime Pie:

300g of Ginger Nut biscuits
100g of Lotus Biscoff biscuits
200g of unsalted butter
4 tablespoons of brown sugar
125ml of fresh lime juice (I used three LARGE limes)
2 eggs plus 2 egg yolks (so 4 eggs)
Zest of two limes
397g tin of Condensed Milk
250ml of whipping cream

Preheat your oven to 170oC.

Put the two kinds of biscuit into a strong plastic bag and WHACK with a rolling pin until broken into a very fine powder. It's probably easier to whizz them up in a food processor but where's the fun in that? There's something special about doing these things the old-fashioned way.

Prepare to be smashed!
A few minutes later
Add the crumbs and the brown sugar to a large mixing bowl and melt the butter over a low heat until liquified.


Pour the melted butter over the biscuit crumbs and coat them evenly. Transfer to a greased 22cm springform tin. Using the back of a spoon, press down firmly into the base and up the sides of the tin. Chill for 10 minutes.

Bake the base for 10 minutes or until golden brown. I noticed some drips of butter leaking out the base of the tin so I would recommend putting a roasting tin underneath while it cooks. Take it from me - it'll save a whole load of cleaning time later!

To make the filling:


Grate the zest from two large limes.


Juice three large limes or five small limes. You'll need 125ml of juice. Strain through a seive to remove pips and pith.


Whisk the eggs, extra yolks and lime zest together until light and creamy. A couple of minutes should see this done. I used an electric mixer for this.

Done.
Whisk in the condensed milk, lime juice and cream for 1 minute until combined.

Light and fluffy.
I suppose I was expecting the mixture to be green at this point as all the shop-bought Key Lime Pies I've ever tried have been highly coloured. However, as you can see, the mixture is a pale yellow. It remains this colour even after cooked. So now would be a good time to add a few drops of green food colouring if you'd prefer your finished pie to look greener. Not too much though. It's not quite Halloween yet!!

Pour the mixture into the biscuit base. I had quite a bit left over so I've frozen it in Tupperware for a later date. I'd imagine this recipe would work perfectly in little ready-made pie cases. I'll let you know. Pop into the oven for 45 minutes. Ideally it should be just set in the centre.

Cooling before chilling
 See what I mean about the colour? Smells amazing though. You can see from this picture that the bottom edge 'caught' during the final stages of baking. It shouldn't matter too much as I got to the oven just in time. And you'll see in a minute that the decoration will cover this minor flaw.

Once the pie has cooled, pop it into the fridge and chill for an hour.

I decorated my pie with Flake. Not only is this my favourite chocolate bar but it's a dream to work with as you can mash it up while it's still inside the wrapper then simply open and pour.


You might like to decorate your pie with lime slices and dollops of whipped cream instead.

I will let you know how the finished pie goes down at the Coffee Afternoon tomorrow. If you would like to donate to a great cause then click here to visit Beth's JustGiving page.