Showing posts with label no bake. Show all posts

Wednesday, 4 November 2015

Firework Goodies


The days are slipping past at a rate of knots. One minute it's Halloween and the next it's Bonfire Night! Before we know it it'll be Christmas.

Here are some simple ideas for tomorrow night. Remember, remember the 5th of November!


I'll be back around the middle of November with a more structured blog post - I'm thinking Chocolate Ferris Wheel as it's still a 'Realm of the Lost' theme until we move onto the more Christmassy recipes that accompany 'Bree McCready and the Half Heart Locket'. 

It's Junior's birthday soon and he is a Nutella freak so I'm thinking his birthday cake will be a less traditional cheescake affair this year. You'll have to wait and see. Until then wrap up and have fun!

Chocolate Catherine Wheels


Mmm. I wonder what I'll do with that extra Flake?...
I used ready rolled shortcrust pastry
Crush the Flakes inside their wrapper then sprinkle over
Crispy and sweet
Chocolate Banana Skyrockets


These go in the freezer and are delicious - like chocolate covered ice-cream

Chocolate Sparklers


Orange sparkly Matchmakers dipped in white chocolate and sprinkled with sugar strands

Marshmallow Missiles

Preparation - Marshmallows on sticks & melted chocolate
Decorated with Popping Candy and coloured confetti


Stay safe!

Friday, 30 October 2015

Halloween Treats

"Chills in the night air are tingling skin
The veil between worlds is now growing thin
Bright spirits gather, the dead return
Drawn to the flickers where candles burn"
Louise Heyden


Did I scare you? Sorry! But I'm getting into the Halloween spirit. It's tomorrow in case you didn't already know. As promised, here are a few simple goodies which require no baking whatsoever...just a few hours in the kitchen and A LOT of chocolate!

Have a lovely time tomorrow night. Stay safe if you're out Trick or Treating and remember to give your teeth an extra clean before you go to bed.

Mummy lecture over.

These took the longest to make...and the most mess to clear up (at 1 o'clock this morning!)
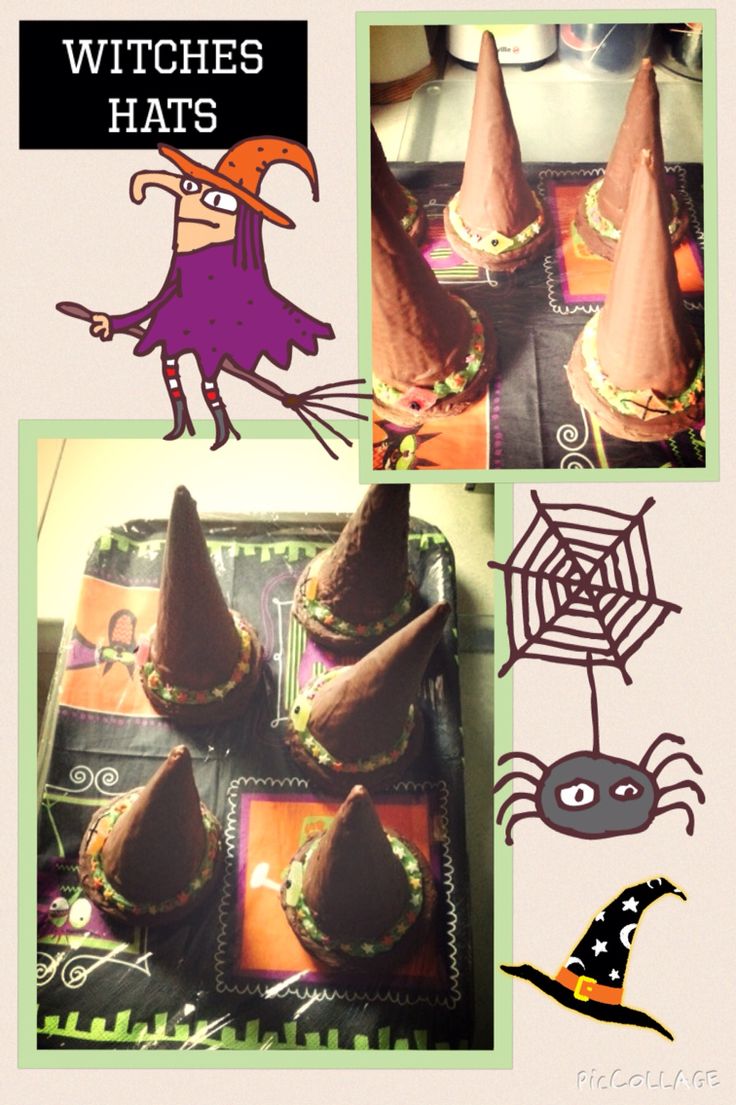
It's a pretty simple idea but tricky to assemble. Inside these chocolate hats are lots of little sweets - Skittles, chocolate buttons, Smarties etc - so attaching the ice cream cone to the Wagon Wheel base involved some pretty impressive construction skills and lots of patience! To my frustration I discovered that because of a slight slant to the waffle style cone, there was a gap at the bottom of the cone - big enough to allow some of the smaller sweets to spill out. So I had to carefully craft thin strips of Royal icing (luckily I had some ready made stuff to hand) to wrap around the bottom of the cone. I knew this 'patch up job' would be invisible once the chocolate was painted on. 
Once the basic structure was complete it was a case of painting on melted chocolate with a pastry brush then waiting for that to set in the fridge before adding the finishing touches. I'm hoping the final result will be like a Pinata so the kids will bite into the top of the hats to reveal the hidden goodies inside. I won't know for sure how everything has turned out until tomorrow night but I can hear the sweets rattling around inside so that's a good sign. And I'm quite sure these are going to taste amazing.


Again, a very simple idea which looks effective. I used small waffle biscuits for the base but you could use Oreos or even made your own basic cookies. 

I rolled out icing, cut it to size with a cookie cutter then stuck it onto the biscuit base using jam. I used edible writing icing (which I bought from Lakeland) to give a bloodshot effect and Smarties were used to create the different coloured Irises.


These don't require much skill but they're pretty and magical. A nice change to blood and gore! 

I dipped chocolate fingers into melted chocolate  then laid them flat onto greaseproof paper before sprinkling multi-coloured stars on top.

Make a wish!


Cadbury's Mini Rolls are fab at this time of year as you get the kind with green slime jam and raspberry blood inside.

The monster faces were made using white chocolate buttons, mini chocolate beans and black icing. I got the small gummy teeth from Morrisons.


Line up white chocolate fingers along a cooling rack and drizzle over melted white chocolate to create the look of bandages. Use tiny dots of black writing icing for the eyes. 

I love these! 


So, there you have it. Couldn't be simpler really and yet I know the kids are going to love these treats.

I have to confess to having eaten a few 'spare' chocolate fingers and to licking a few bowls over the last couple of days so I will probably not be partaking in the scoffing of any more Halloween goodies. In fact I am craving some homemade soup and fruit! 

Have fun!

Until next time, here is a spooky extract from Bree McCready and the Realm of the Lost, which of course is my inspiration for all these Halloween goodies.

"Bree hit the fresh air with a stitch in her side. Running in the direction of Gillespie Gardens, she hoped that Sandy had made his way back to Freesia House. She slowed when she spotted some children heading her way, dressed for Halloween in ghoulish costumes, shouting 'Trick or Treat!'
Stepping off the pavement to let them pass, she spotted three small figures whizz by on the other side of the road. At first she thought it was another group of children, wearing gruesome masks, but when she looked closer she caught a glimpse of bare, red skin and yellow eyes. Gargoyles."


Wednesday, 23 September 2015

"Every Path Has Its Puddle" Cake

A recipe inspired by some good advice from Madeleine McCready


In chapter 4 of Bree McCready and the Flame of Irenus Bree, Sandy and Honey meet a man called Dunubas. During a conversation with him Bree imparts some words of wisdom.

"My Mum has a saying. Every path has its puddle."
Dunubas looked puzzled.
"It means that life is full of problems," she explained, "but there are always ways round them."

Life is a bit like that, isn't it? We do our best to walk in a straight line but more often than not the road gets a little bumpy as obstacles get thrown in our way. Sometimes the puddles we face are deep, murky ones and sometimes they are nothing more than shallow, sparkly pools into which we can see our reflection and perhaps learn something about ourselves. Either way, the secret is to be prepared. Sink or swim! 

My 'Puddle Cake' is definitely one for jumping straight into! This no-bake traybake resembles a gravelly, bumpy path - the rocks and pebbles represented by Maltesers and smaller milk and white chocolate balls. If only all the paths we walked along were made from such scrumminess - we'd never get anywhere! The puddle on this path is an ice cold glass of milk which I think compliments the sticky sweetness of the cake perfectly. 

This recipe freezes well so it can be made a couple of months in advance of a special occasion...if you have the willpower to keep it that long!

Here's what you'll need:


400g of Maltesers - I used 4 big bags but kept some aside for decoration (and for testing purposes!)
450g of milk chocolate
180g of unsalted butter
4 tablespoons of Golden Syrup
250g of Rich Tea biscuits (approximately 30 biscuits)

Method:

Grease a 9" x 13" tray with a small knob of butter. This makes it easier to get the finished product out.

Break up the bars of chocolate into pieces and put them into a large bowl with 180g butter...


...and the Golden Syrup.


Place the bowl over a pan of simmering water and melt everything until smooth and glossy. Remove from the heat and allow to cool for a few minutes.

Meanwhile put the Rich Tea biscuits into a bag and get your rolling pin ready.


SMASH! the biscuits with the end of the rolling pin but not too much. You want some bigger chunks of biscuit left.

Weigh out 400g of Maltesers. No pinching!


Put the Maltesers into a separate bowl (large) and add the crushed biscuits.

Sweet 'rubble' to lay the foundations of your path


Now pour the chocolate mixture over the biscuit mixture and mix thoroughly. Try to coat as much of the Rich Teas as you can as this will allow the traybake to set well. You will notice that some of the chocolate comes off the Maltesers as the chocolate goo is still warm. I like this as it makes them look more like little rocks.

Pour the coated mixture into the foil tray. Spread evenly and press down with a fork (I sometimes use a potato masher to make things even more firm). Make a thick chocolate icing (just icing sugar, hot chocolate powder and a little milk) to spread over the top and then sprinkle the little chocolate balls evenly across. Finish by placing some Maltesers on top.


Chill for a couple of hours in the fridge and then cut into squares.


 Now pour yourself a glass of milk and enjoy!!


So remember - the next time you come across a puddle on your journey you'll be prepared. So, take a deep breath, pull on your wellies and jump in! It may seem deep and dark but there's always a way out/round.